
 Black Steel Doors
 Woodstock Campers
 Phillips Joinery
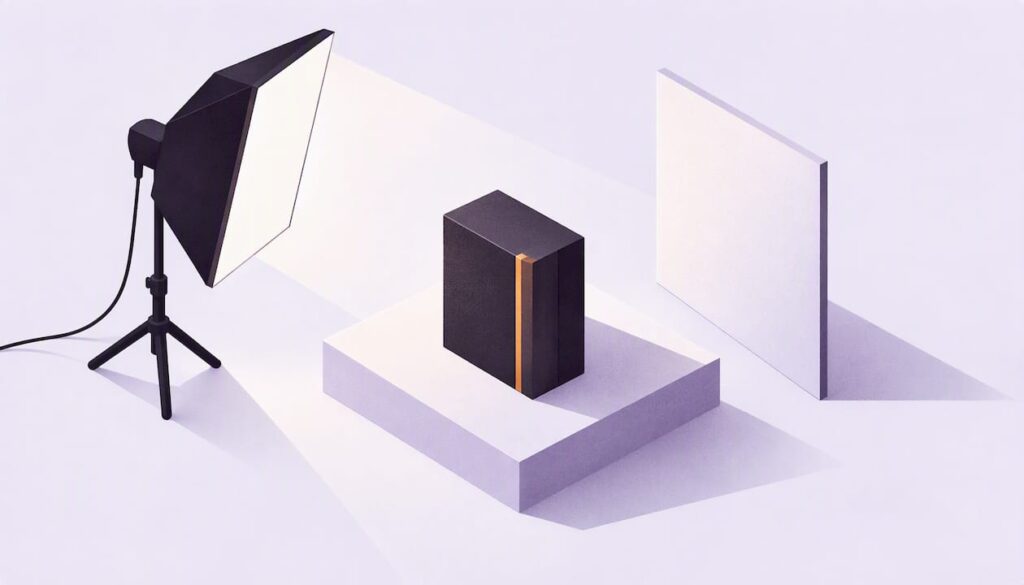
Good lighting for product photos comes down to three things: soft, even light, a plain background, and one consistent light colour. You don’t need a pile of kit. A window, a white reflector and a bit of patience will beat a cupboard full of expensive gear used badly. Below, we’ll walk through the types of light, simple setups you can copy this week, the mistakes that wreck most shots, and how to choose kit if you’re buying.
TL;DR
- Soft, diffused light flatters most products. Hard, direct light (a bare bulb, a camera flash) creates harsh shadows and glare.
- One light plus one reflector is enough to start. Add a second light only when you can see exactly what’s missing.
- Use one type of light per shoot. Mixing daylight with indoor bulbs gives you colour casts that are a pain to fix.
- Shiny items need big, soft sources. Matte items are forgiving. Glass and metal are the boss level.
- If you sell lots of products, consistency matters more than perfection. Write down your setup and repeat it.
Table of Contents
- Why lighting makes or breaks a product photo
- What light actually does to a product
- Natural light or studio light?
- The main types of light, in plain English
- Simple setups you can copy
- Controlling reflections, shadows and colour
- Choosing lights without wasting money
- Product lighting mistakes to avoid
- Where well-lit images pay off
- Our view: consistency beats gear
- Want us to handle the lighting?
- FAQ
- Sources
Why lighting makes or breaks a product photo
Customers can’t pick your product up. The photo is the only thing they have, so it has to do the job of their hands and eyes. Shopify’s guidance on product photography points out that good photos show people what they’ll actually get and can build trust. It also warns that indoor bulbs and the built-in camera flash tend to produce harsh contrast, reflections and odd colour shifts.
That’s the everyday problem in one sentence. You put a mug on the kitchen table, flick the flash on, and the result looks like a crime-scene photo of a mug.
It isn’t only a small-shop issue. The BBC’s own photography creative guide treats poorly lit, low-resolution or out-of-focus images as unsuitable for professional use, and sees lighting quality as a signal of high production values. If a broadcaster judges images that way, your customers are probably doing the same, even if they couldn’t tell you why one listing feels more expensive than another.
If you want the bigger picture of how photography fits into a brand, we’ve covered it in photography for brands and why it matters. Here, we’ll stick to light.
What light actually does to a product
Brightness is the least interesting thing about light. What matters is how it describes the object. MakeAD’s lighting guide breaks this into four visible cues: highlights, transitions, shadows and reflections. Between them, they tell the viewer what the product is made of and what shape it is.
In plain English:
- Highlights show where light hits. A soft highlight on a ceramic bowl says “smooth glaze”.
- Transitions are the gradient from bright to dark. A gentle gradient says “rounded”. A sharp edge says “flat or angular”.
- Shadows ground the product. Without them it floats, like a cut-out stuck on a page.
- Reflections tell us about the surface. Controlled, they say “glossy and premium”. Uncontrolled, they show your window, your jumper and your face.
MakeAD also separates two kinds of shadow. A contact shadow, the dark line right where the product meets the surface, anchors it in place. A cast shadow shows which way the light is coming from and how far the object sits from the surface. Photographers often lose the contact shadow by over-lighting from below, and the product starts to look pasted on.
Once you start looking for these four cues, you’ll see them in every good product image you scroll past.
Natural light or studio light?
Both work. The honest answer is that it depends on the product, how many you need to shoot, and how consistent the results have to be.
Natural light (a big window, ideally with no direct sun) is free, soft and flattering. It’s lovely for lifestyle shots: skincare on a bathroom shelf, a candle on a wooden table, a jumper draped over a chair. The catch is that it changes. Cloud rolls in, the sun moves, and the 10am photos don’t match the 2pm ones. In a British autumn or winter, you may only have a few decent hours anyway.
Studio light (flash or constant LED) gives you the same result at 9am or 9pm, in July or January. That repeatability matters hugely if you’re shooting a whole catalogue, because customers notice when products in the same range look like they were photographed in different countries.
A rough guide:
| Situation | Better choice | Why |
|---|---|---|
| A handful of products, tight budget | Window light with a reflector | Free, soft, quick to learn |
| Lifestyle or “in use” scenes | Window light, or studio light made to look like it | Feels natural and believable |
| Whole catalogue, many SKUs | Studio light | Identical results every session |
| Shiny, glass or metallic items | Studio light with big softboxes | You control where reflections fall |
| Shooting after work or in winter | Studio light | No dependence on the weather |
If you’re using window light, put the product beside the window rather than in front of it, and use a sheet of white fabric or a diffuser panel if the sun is coming in directly. Turn off the room lights. This is the single most common fix for muddy colour, because lamps and daylight don’t match (more on that in the mistakes section).
The main types of light, in plain English
The good news is that there are only a few families of light, and each has a clear job.
Phil Sills’ product photography course lists the useful options as flash, constant LED and daylight. LED heads can usually take reflectors, grids, softboxes or strip lights, which is what makes them so flexible. LED also lets you see the result instantly, and many panels, strips and heads let you change the colour of the light.
When it comes to continuous lighting, Practical Ecommerce describes the choice as LED, fluorescent or tungsten. LED is energy-efficient and runs cool. Tungsten gives an even spectrum, but throws off a lot of heat, which isn’t great if you’re photographing chocolate, candles or anything else that melts.
| Light type | Best for | Watch out for |
|---|---|---|
| Continuous LED | Beginners, small studios, video as well as stills | Cheap panels can have poor colour quality |
| Studio flash (strobe) | Crisp, high-powered, repeatable results | Costs more, and you can’t see the effect until you shoot (unless it has a modelling lamp) |
| Window light | Lifestyle shots, free practice | Changes through the day and the seasons |
| Tungsten | Even colour spectrum | Heat, and power use |
| Ring light | Small items, flat-lay beauty shots | Circular reflections on glossy products, and flat results |
| Speedlight | Portable, can be bounced | Needs learning to use well off-camera |
A word on ring lights. They’re everywhere because they’re cheap and easy, and they’re fine as a gentle fill. But on their own they tend to flatten a product, and on anything shiny you’ll get a perfect little ring reflected in it. Use one as a helper, not the main act.
Simple setups you can copy
The one-light setup
Start here. It forces you to learn what light does before you start adding more of it.
- Put the product on a table with a plain background behind it (white card, a roll of paper, or a neutral wall).
- Place one softbox, or one LED panel with a diffuser, to one side of the product and slightly behind it, angled in.
- On the opposite side, hold a white reflector (a sheet of foam board is fine) close to the product to bounce light back into the shadows.
- Take a shot, look at the shadows, and move the reflector closer or further to taste.
That’s it. Side light shows texture. Moving the light further back and behind the product gives you a glowing edge. Moving it nearer the camera gives you flatter, more even light. Everything else in product lighting is a variation on those moves.
The three-point setup
The classic. You have a main (key) light, a fill to soften shadows, and a back or rim light that separates the product from the background. It suits bottles, tech, cosmetics and anything with edges you want defined. Add the lights one at a time and take a test shot after each, otherwise you won’t know which one is causing the problem.
Light tent or lightbox
For small and medium-sized products, Practical Ecommerce says lighting tents are often a good option. They’re basically a diffuser wrapped around the product, so light arrives from all sides. They’re ideal for jewellery, small gadgets and anything reflective, and they’re very forgiving when you’re learning.
Ring light plus two softboxes
A BBC Bitesize article about a fashion entrepreneur describes an indoor setup with a ring light in the middle, a softbox either side, and the camera in the middle. It’s a handy, even, front-facing arrangement for flat or garment shots where you want everything visible and no dramatic shadows.
Controlling reflections, shadows and colour
Soften first, then adjust
Diffusers spread and scatter light to soften it, as Practical Ecommerce explains. The bigger the light source compared with the product, the softer the light. A 90cm softbox close to a lipstick is much softer than the same softbox across the room.
There’s a trade-off. Photographer Caleb Gaskins, writing for Adobe, cautions that every layer of diffusion cuts the light output, so you’re always balancing intensity against softness. If your photos suddenly look dark and your shutter speed has crawled, you may have layered up too many sheets. Move the light closer instead.
Use reflectors before buying more lights
Softboxes help with shiny or detailed items by cutting strong reflections, while reflectors bounce light back into shadowed areas, according to Colbor’s studio lighting guide. Manfrotto argues that reflectors are often underrated and can be a more elegant, cheaper way to fill shadows than buying extra strobes. We agree. A £5 piece of white foam board will often do more for your photos than a second light.
Black card works the other way. If a product looks washed out, a black flag beside it soaks up light and adds definition. Good for dark bottles and anything you want to look moody.
Taming glossy and glass products
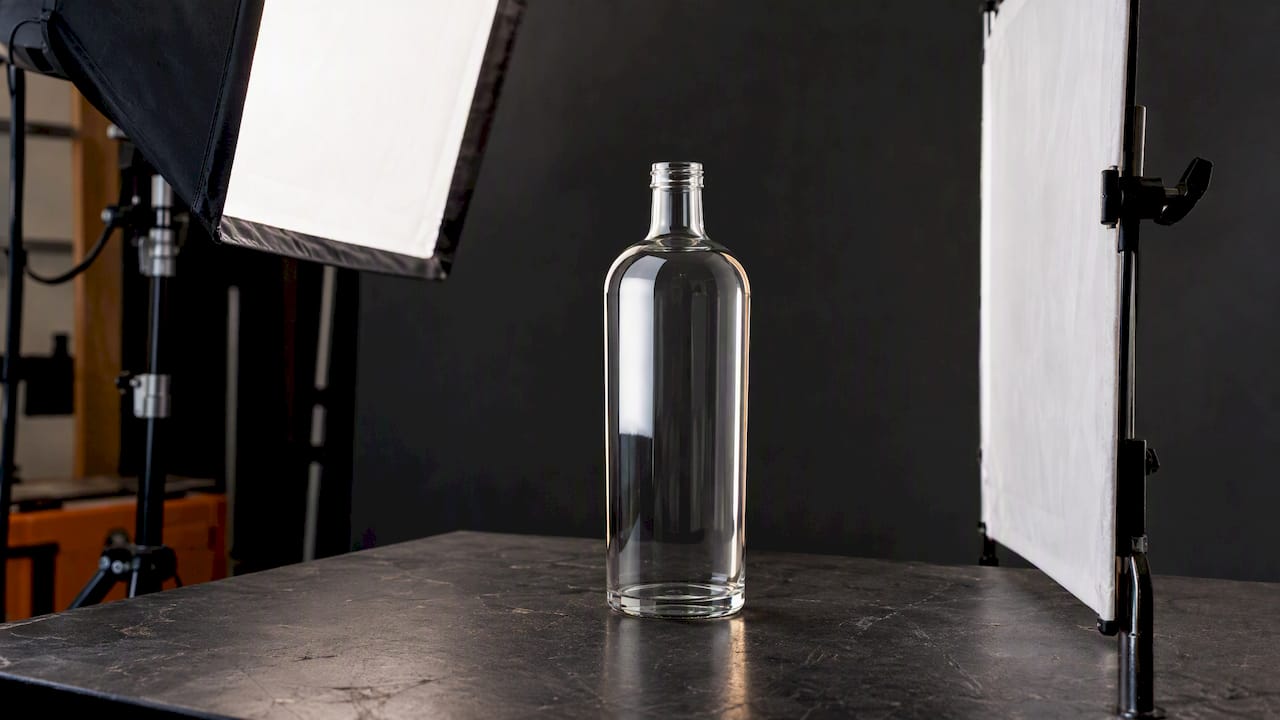
The trick with reflective items is to light the reflection, not the object. Put a large softbox or a white sheet where the surface will mirror it, and you’ll get one clean, deliberate highlight instead of lots of messy ones. A strip light down the side of a bottle gives the classic edge line you see in drinks photography. Take your time, move the light by a few centimetres at a time, and be prepared to shoot a few frames and combine them if you’re editing professionally.
Keep your colour honest
For continuous lights, The Societies of Photographers recommends looking beyond brightness to colour rendering, spectral quality, flicker performance and beam angle. Colour rendering matters most for products: if your red jumper turns up orange online, expect returns and unhappy emails. Set a custom white balance using a grey card, shoot in RAW, and keep all your lights the same colour temperature.
Choosing lights without wasting money
When readers ask for the best lights for product photography, the useful answer is a set of questions rather than a brand name:
- What are you shooting? Small, shiny things need soft, controllable light. Furniture and clothing need space and even coverage.
- How often? Once a quarter, a window and reflector are plenty. Every week, a continuous LED kit with softboxes will save time.
- Do you shoot video as well? Then continuous LED is the sensible choice, because it works for both stills and video.
- Can you see the colour quality? Look at the colour rendering figures (CRI or similar) on the product page, not just the wattage.
- Is there room to store it? Stands and softboxes take up more space than you think. Folding kit helps.
A sensible starter kit for most small businesses: two continuous LED lights with softboxes, two stands, a few reflectors (white and black), a grey card, a tripod and a roll of backdrop paper. Add a light tent if you shoot lots of small items. Upgrade later, once you know what you keep wishing you had.
Product lighting mistakes to avoid
Most bad product photos come from the same handful of errors.
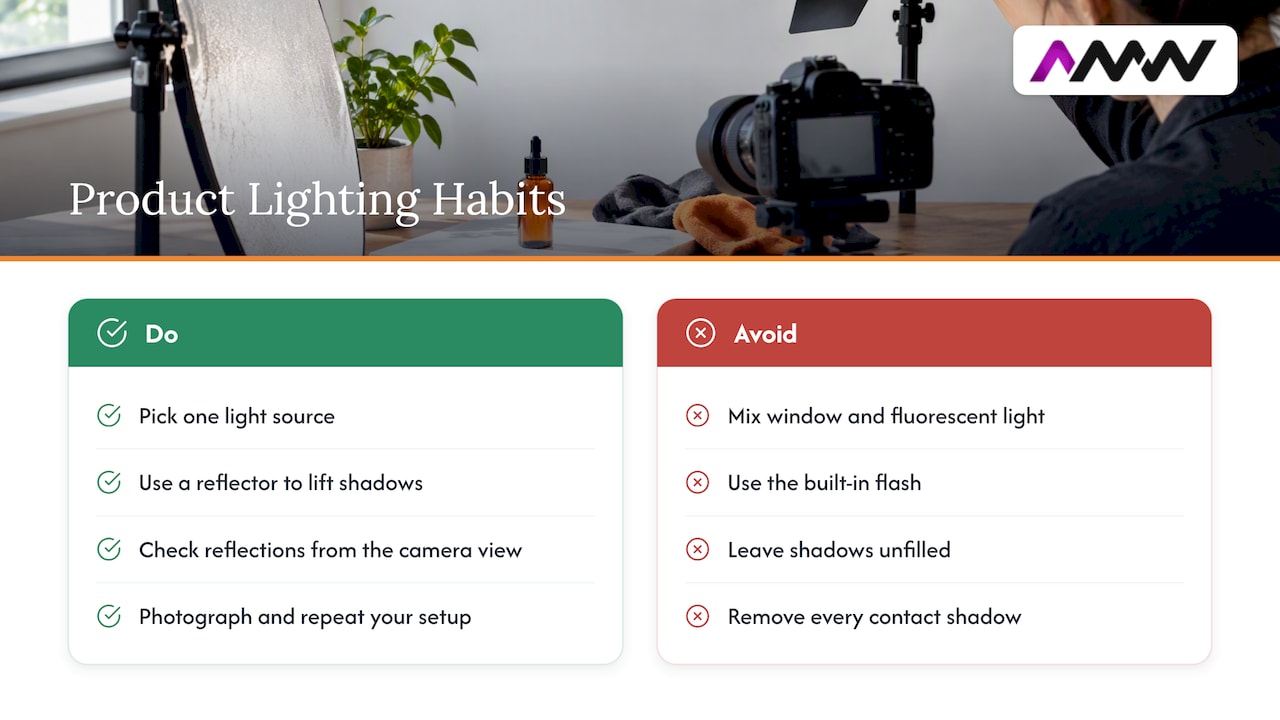
Mixing light sources. This is the big one. Lumaprints lists mixing, for instance, window light with fluorescent bulbs as the most typical lighting error, because each source needs a different white balance. Pick one source and switch the rest off.
Using the built-in flash. Hard, flat, and it bounces straight back off anything shiny. Shopify says the same thing in its product photography guidance, linked earlier.
Skipping the fill. Light from one side with nothing to lift the shadows leaves half your product in the dark. A reflector fixes it in seconds.
Ignoring reflections. Check the product from the camera’s point of view. If you can see a window, a lamp or yourself, move something.
No shadow at all. Cutting out every shadow can make the product look pasted on. Keep a soft contact shadow, as MakeAD explains above.
Inconsistent set-ups. If your first ten products are lit one way and the next ten another, your shop looks patchy. Take a photo of your setup, note the distances, and repeat it.
Forgetting the basics of the product itself. Dust, fingerprints and creases show up under good light. Better light is less forgiving, so wipe, steam and lint-roll first.
If you’re planning a bigger shoot, a clear brief saves a lot of this. We wrote about how to write a product photography brief so everyone knows the lighting style, backgrounds and shot list before anyone picks up a camera.
Where well-lit images pay off
Strong lighting isn’t just for your product pages. The same image ends up in ads, emails, marketplaces and social posts, and it often has to hold up in competitions and features too. If you want to see what dramatic, deliberate lighting looks like at the top end, the dramatic lighting open call is a good example of how far a single light and a bit of imagination can go.
On the practical side, make sure you own or are licensed to use what you publish. Our plain-English guide to image licensing in the UK covers that. And if your images feed a shop, the product data around them matters too: see our piece on ecommerce SEO and product data fixes.
Our view: consistency beats gear
We shoot a lot of content for brands, and the pattern is always the same. The brands that look polished aren’t the ones with the biggest lighting budgets. They’re the ones that decided on a look and stuck to it.
Here’s what we’d tell a friend who runs a small business and asks where to start:
- Decide the look first. Bright and airy? Dark and moody? Clean white for marketplaces? The light follows the decision, not the other way round.
- Light for the customer’s question. Is it a good texture? A true colour? The right size? Your lighting should answer whichever worry stops people clicking “buy”.
- Treat photos as an asset, not an expense. A well-lit image gets reused across your site, ads, emails and social posts. That’s where the return comes from.
- Know when to hand it over. DIY is brilliant for a few products. Once you’ve got a range, a launch, or a campaign, a professional team saves you hours and gives you a consistent set of images, with the lighting, styling and editing all sorted. That’s what our photographers and video team are for.
And because photos rarely live alone, we plan them alongside video, social and your website, so the look carries through everywhere. Our approach is built around clear reporting and no long-term contracts, so you can see what’s working.
Amir Wanas, founder of AMW Media
Want us to handle the lighting?
If you’d rather spend your time running the business than wrestling with softboxes, we can take it off your plate. AMW Media produces photography and video for brands, and we can fit it around your social media, website and ad plans so everything looks like it belongs together. Have a look at our video production and photography services, see recent projects, or read about our professional photography services for business.
Selling online? Our retail and ecommerce marketing page shows how we pair good product imagery with campaigns that sell it.
FAQ
What is the best lighting for product photos?
Soft, diffused light from a large source is the best starting point for most products. A softbox or LED panel with a diffuser, plus a white reflector on the opposite side, will give you gentle shadows and clean highlights. Keep all your lights the same colour so the product’s true colour comes through.
Can I take good product photos with just a window?
Yes. Place the product beside a large window, avoid direct sun or soften it with a thin white sheet, and bounce light back with white card on the shadow side. Switch off indoor lamps so you don’t mix colours. The limit is consistency, because daylight changes through the day and the seasons.
Are ring lights good for product photography?
They’re useful as a gentle fill, and they suit small, flat items. On shiny products they leave a round reflection, and on their own they can look flat. Most photographers use them alongside softboxes rather than instead of them.
How many lights do I need?
One light and a reflector will cover a lot of products. Two lights give you more control over shadows and background. A third (a rim or back light) helps define edges on bottles, tech and cosmetics. Add them one at a time and only when you can name what’s missing.
Is continuous LED or flash better?
Continuous LED is easier for beginners because you see the effect instantly, and it works for video too. Flash is more powerful and gives crisp, repeatable results, but costs more and takes a little longer to learn. If you shoot both stills and video, LED is the simpler choice.
Sources
- Shopify Help Center: Taking product photographs
- BBC Photography Creative Guide 2025
- Phil Sills: Lighting Types and Uses
- Practical Ecommerce: Product Photography, Part 3, Artificial Lighting Basics
- BBC Bitesize: How I turned my passion for fashion into a business
- Adobe: Diffused light photography
- Colbor: Guide to studio lighting for product photography
- Manfrotto: Photography lighting reflectors
- The Societies of Photographers: LED lighting for photography, colour quality and CRI
- Lumaprints: DIY product photography mistakes
- Profoto dramatic lighting open call
Recommended
- Product Photography Brief: How to Write One That Works
- Color Grading Basics: Make Brand Videos Hook in First Three Seconds
- Photography for brands: what it is and why it matters
Our free marketing audit looks at your site, your ads and your content, and comes back with a 30 day plan. No pitch deck.

Founded AMW Media in 2024 and runs strategy, paid media and the CRM builds. The reason everything here is in house and measured in revenue. Meet the team.